1. PROPER PREPARATION OF SURFACE
The wall must be firm, levelled, dry and clean. Uneven surfaces greater than 2 mm must be levelled with specific products. Never level using adhesive. All cracks and imperfections should be repaired, so that the wall is completely smooth. The moisture content of the surface must be under 2%.
2. INSTALLATION MATERIAL
For a correct installation, several factors must be taken into account: Material kind of the wall to be tiled (synthetic pannels, plaster, wood, etc.), wall stability, environmental conditions, kind of surface to be covered , speed of carrying the work, etc. All the above parameters determine the choice of the adhesive kind.
All the adhesive materials recommended by DUNE have been previously tested in our facilities, in controlled environmental conditions and on rigid brick and/or concrete walls. Under different conditions from the above mentioned, it is recommended to test firstly and if in doubt, please contact DUNE or the adhesive distributor.
DUNE always recommends to test first the material with minimum two pieces before placing all the material.
It is recommended to use white Exposy adhesives to minimize the change of the glass tone, covering the whole surface of the piece.
Consult adhesives table.
It is very important to avoid applying coats of adhesive more than 3 mm thick, given that the shrinkage of the adhesive can generate defects at the back of some finishes (see attached photos).
It is essential that the pool is completely waterproof. We recommend using specific sealing materials. Make as many tests as necessary to ensure the swimming pool walls are completely waterproof. Please, note levelling materials are not waterproof.
3. INSTALLATION
We recommend starting the installation from the floor to the ceiling, continue in phase to allow the adhesive the necessary time to get dry. This will avoid vertical displacements. Extend a thin layer of adhesive on to the surface where the piece will be installed (3mm approx.) Then, use a notched trowel no. 3 to make incisions into the adhesive layer. Place the piece while the adhesive is still soft and before a dry layer of film forms on the adhesive surface. Once the piece is placed, press carefully to obtain a correct adhesion and to cover possible areas without adhesive.
Important: make sure that the distance between one sheet and another is the same as the one among the components so that all the joints look alike.
For irregular mosaics, we recommend pulling out some components and relocating them in the joint between two sheets. This will improve the finish of the mosaic.
Handcrafted molten glass mosaics present variations of both colour and shape between the different tesserae that make up the mosaic. Small imperfections and/or irregularities are considered to be a part of this process and, as a result, will not be grounds for complaint (CINEMA, GILDED, SALSA and BLUES).
LYRA, NICE, ALEGRIA, KANNA and ARGUS references, must not be exposed to natural light because the organic inks lose their colour.
IMPORTANT: SHOWER FLOOR: Where mosaics are installed on shower floors, it is highly recommended to apply an anti-skid product. DUNE recommends and sells ANTIGLISS.
CUTTING
Use special pliers for glass mosaics or radial disc for glass or porcelain water cooled.
4. GROUTING
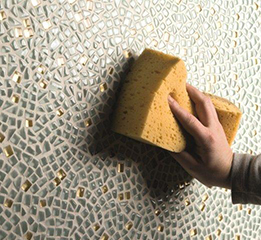
All joints must be perfectly clean and dry and having a minimum depth of 2mm. Use a flat rubber trowel to spread the paste, being sure that the joints are completely covered. Use a wet sponge or neutral PH products – never abrasive products – to wash off immediately the excess of grouting paste from the surface before it dries. If this happens, use a cement remover to clean the surface.
For better waterproofing, we recommend an epoxy grouting paste, especially in water areas.
Consult the grouting materials table.
Important:The colour of the grouting paste might change the product’s appearance. We recommend to test with some pieces before grouting the entire surface.
Important: Due to the curved finish of the ESSENTIAL and DOTS mosaics, a thick layer of paste remains when grouting. To ensure the correct finish and that the circle looks complete, it must be cleaned repeatedly to be able to remove that excess paste.
5. CLEANING AND MAINTENANCE
For everyday cleaning, use regular pH neutral cleaners. Do not use abrasive products.


