1. PROPER PREPARATION OF SURFACE
The wall must be firm, levelled, dry and clean. Uneven surfaces greater than 2 mm must be levelled with specific products. Never level using adhesive. All cracks and imperfections should be repaired, so that the wall is completely smooth. The moisture content of the surface must be under 2%.
2. INSTALLATION MATERIAL
For a correct installation, several factors must be taken into account: Material kind of the wall to be tiled (synthetic pannels, plaster, wood, etc.), wall stability, environmental conditions, kind of surface to be covered , speed of carrying the work, etc. All the above parameters determine the choice of the adhesive kind.
All the adhesive materials recommended by DUNE have been previously tested in our facilities, in controlled environmental conditions and on rigid brick and/or concrete walls. Under different conditions from the above mentioned, it is recommended to test firstly and if in doubt, please contact DUNE or the adhesive distributor.
It is recommended to use white Exposy adhesives to minimize the change of the glass tone, covering the whole surface of the piece Place with C2 cement based adhesive.
Consult adhesives table.
DUNE always recommends to test first the material with minimum two pieces before placing all the material.
3. INSTALLATION
We recommend starting the installation from the floor to the ceiling, continue in phase to allow the adhesive the necessary time to get dry.
Extend a thin layer of adhesive on to the surface where the piece will be installed (3mm approx.) Then, use a notched trowel no. 3 to make incisions into the adhesive layer. Place the piece while the adhesive is still soft and before a dry layer of film forms on the adhesive surface. To install 30×60 pieces or similar, extend a thin layer of adhesive on the surface where the piece will be installed (vertically) and another layer on the back of the piece itself, in the opposite sense (horizontally).Then, use also a notched trowel no. 3 and make the incisions into both the adhesive layer of the wall and in the opposite sense in the piece. Do not use dot setting or dab the adhesive during installation.
Once the piece is placed, press carefully to obtain correct adhesion and cover possible areas without adhesive.
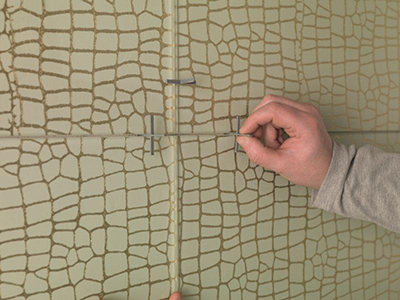
For a better fixing, it is recommended to set the pieces by using some tape or a wooden strip. To correct the position of the bases, it is recommended to take them off and correctly clean their back part before placing them again. We recommend a minimum joint of 2mm and the use of crosspieces. For areas with severe thermal dilatation or non-stable surfaces (plasterboard), a minimum joint of 3 mm is strongly recommended.
GLASS series’ items can be combined with the rest of CERAMIC tiles, as long as tiles are installed with joints in order to minimize the small size dissimilarities between pieces made of different materials.
References from the AURA series are sensitive to sun light. It is highly recommended to avoid direct sun exposure, even if they are installed on indoor walls (direct light through windows without curtains).
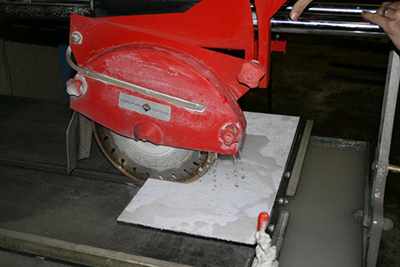
CUTTING AND DRILLING
STRIGHT CUTS: diamond blade wheel fitted with water-cooling systems.
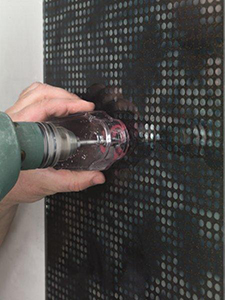
DRILLING: Use a drill bit for perforating glass. We recommend using hollow drills with a diamond finish. The drill bit must be constantly cooled. Use the drill at a low speed and without hammer action. Do not apply excessive pressure on the piece while drilling; allow the drill bit to gradually perforate. Otherwise, the edges can break or cracks can appear later on. Be especially careful when the hole is about to be finished, this is the most delicate step.
Items with reliefs (VENEZIA) are difficult to bedrilled due to the glass internal forces. It is highly recommended not to do more than one hole and inferior than 8 mm in diameter.
4. GROUTING
All joints must be perfectly clean and dry and having a minimum depth of 2mm. Use a flat rubber trowel to spread the paste, being sure that the joints are completely covered. Use a wet sponge or neutral PH products – never abrasive products – to wash off immediately the excess of grouting paste from the surface before it dries. If this happens, use a cement remover to clean the surface
For better waterproofing, we recommend an epoxy grouting paste, especially in water areas
Consult the grouting materials table.
Important:The colour of the grouting paste might change the product’s appearance. We recommend to test with some pieces before grouting the entire surface.
5. CLEANING AND MAINTENANCE
For everyday cleaning, use regular cleaners con PH neutro. Do not use abrasive products.